Self Help Documentation
Install and configure SPanel WHMCS Server Module
This guide walks you through installing and configuring the SPanel provisioning module in WHMCS. By following these steps, you’ll be able to seamlessly integrate SPanel with WHMCS, allowing for streamlined account creation, package management, and automated billing—all from within your WHMCS environment.
- Download and unzip the archive in your main WHMCS folder, where your modules/ folder resides. Once complete, you should be able to see the SPanel folder inside your modules/servers/ directory.
- Inside your WHMCS admin panel perform the following actions:
- Go to System Settings > Servers > Add New Server.
- Select SPanel from the module dropdown

- Enter your server’s IP address in the Hostname or IP Address field.
- Enter your server’s SPanel folder inside the Username field. This should be either ‘spanel’ or ‘hostpanel’, depending if you have the branding url enabled in your SPanel admin panel.
- Enter your SPanel API access token inside the Access Hash field.
- Click Test Connection and if everything is set up correctly, you will get the Add Server configuration page, where you can add a Name and Hostname for your server.
- Select SPanel from the module dropdown
- Go to System Settings > Servers > Create New Group
- Enter a Name for your group
- Select the name of the server you just created and click Add.
- Save Changes
- Go to System Settings > Products/Services and Create a New Group.
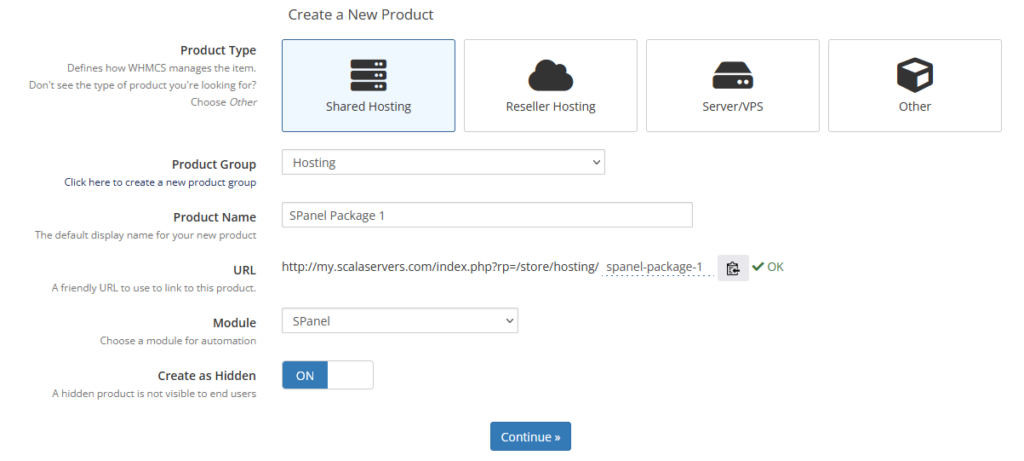
- Go to System Settings > Products/Services > Create a New Product

- Select Shared Hosting from the Product Type options.
- Select your previously created product group from the Product Group select.
- Set a Product Name
- Select SPanel from the Module select.
- Click the Continue button and you will be taken to the Edit Product page.
- Click on the Module Settings tab

- Select SPanel from the Module Name select.
- Select the server group you created in step 2 in the Server Group select.
- Inside the Select Package select, you will see all existing packages in the default SPanel server in the selected server group. If you don’t have any existing packages, you can create some from your SPanel admin interface and get back to this step later.

- Save Changes.
- Go to System Settings > Servers > Add New Server.
- Done!
